If you want to use Eclipse to write programs that use the C++11 thread class, you need to make some adjustments to enable everything to run correctly.
Without these, you’ll run into all sorts of strange errors.
There are three steps to getting your program to run perfectly and here’s what you need to do:
1. Set c++11 as the dialect
When you first include the thread header and declare a thread, if you haven’t set the dialect to c++11, you’ll run into an error like this (generated when Eclipse sees the thread header):
/usr/include/c++/4.9.2/bits/c++0x_warning.h:32:2: error: #error This file requires compiler and library support for the ISO C++ 2011 standard. This support is currently experimental, and must be enabled with the -std=c++11 or -std=gnu++11 compiler options.
To enable C++11 support and clear this message, you need to go into:
Project -> Properties -> C/C++ Build -> Settings
In the Tool Settings tab, under GCC C++ Compiler, select Dialect.
In the Language Standard drop down box, select:
ISO C++11 (-std=c++0x)
2. Add pthread to libraries
Step 1 takes care of the compile errors, and you should now be able to build your project. However, when you run, you will get an error like this:
terminate called after throwing an instance of ‘std::system_error’
what(): Enable multithreading to use std::thread: Operation not permitted
To enable threading, you need to make sure that the pthread library is being linked to your code. On the command line, this is as simple as adding the -pthread flag. However, Eclipse builds and links in two distinct steps, so adding the -pthread flag won’t tell the linker what it needs to do. Instead you need to add pthread as a library. Go to:
Project -> Properties -> C/C++ General -> Paths and Symbols.
Select the Libraries tab, click Add and type:
pthread
in the box.
Now, your project will compile, and you can also run it successfully.
3. To clear syntax errors, add c++11 to compiler settings
However, there’s one more annoying thing: in the editor, the error parser is still flagging the use of any thread related code as unrecognised.
This means you get red underlining and those annoying bugs at the side of the file that pop up a Type ‘thread’ could not be resolved message if you mouse over them.

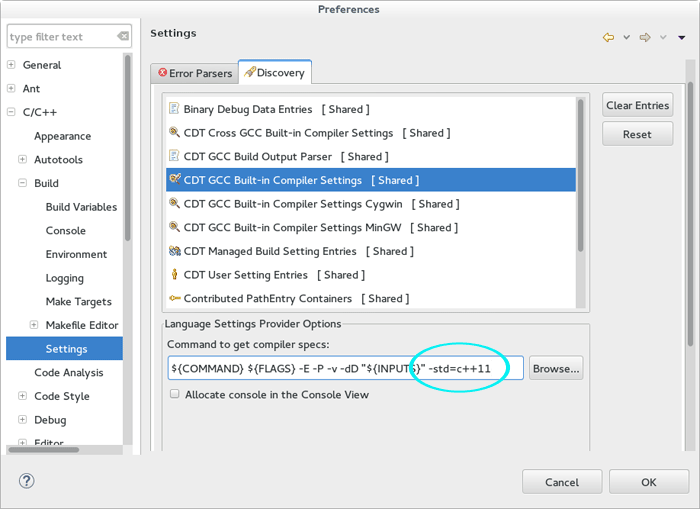
To clear all these errors, you need to do one more thing. Go to:
Windows -> Preferences -> C/C++ -> Build -> Settings.
Select the Discovery tab, and click CDT GCC Built-in Compiler Settings.
Append -std=c++11 in box at bottom:

Last of all, you need to go back to your project, right click and select:
Project -> Index -> Rebuild.
Once that has completed (shouldn’t take long unless you have a mammoth project underway), all the bugs and underlining should disappear on the next rebuild, leaving you with a perfectly happy project that uses C++11 threads and gives you no trouble whatsoever.
